In general, to create a report:
1. Select Reports from the function menu.
2. From the Reports menu, select the category of report. Within each category, there will be common features to the query process. Specific report selections will automatically narrow the parameters by which The Edge will search. Some of the report queries will resemble record queries found in the find item or find customer filters.
|
Activity |
Transaction activity such as daily sales, sales tax, miscellaneous sales activity, trade-ins, returns, timing, tender activity. |
|
Inventory |
Inventory status and activity. |
|
Customers |
Customer reports such as occasion lists, wish lists, charge balances, thank yous, and transactions by location, demographics, or acquisition. |
|
Management |
Performance, advertising, and personnel reports. |
|
Job |
Repair/custom job activities. |
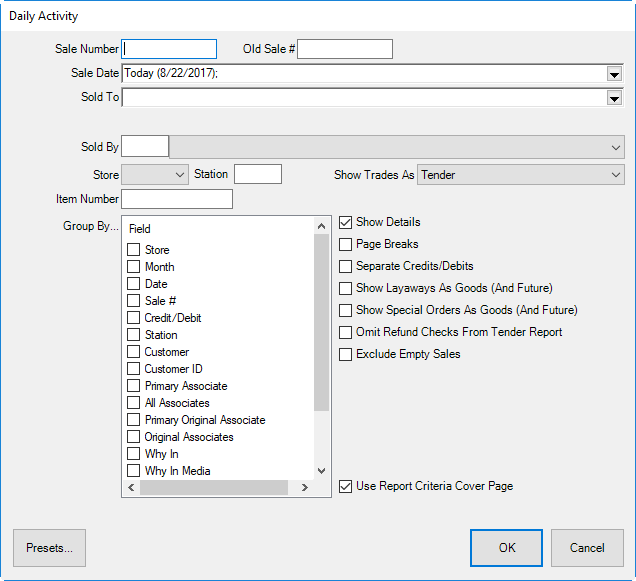
3. From the category, select the specific desired report. The menu may offer more detailed options. The query option window for that type of report will appear. The following example is for Activity reports.
The query options offered here allow you to narrow the report results by various parameters depending on the report type.
|
Sale Number |
Allows you to specify a particular transaction. | ||
|
Old Sale Number |
If you had a previous system, the transaction number as imported into The Edge. | ||
|
Sale Date |
Date or dates that are to be included in the report results. A drop-down list containing a variety of date range options will appear. The default will be the current day’s date. In the Date Range window, there is a much greater variety of date ranges from which to select. This can be helpful when saving presets that include a period of time. More detail about the selecting dates is contained in the section entitled Filtering by Date. | ||
|
Sold To |
Allows you to narrow to a particular customer range by offering a query window similar to that found in the section entitled Finding a Customer. | ||
|
Sold By |
Allows you to specify the ID number of a particular salesperson. Notice the drop-down list that allows you to select from a list. | ||
|
Store |
Allows you to specify a store. | ||
|
Station |
Allows you to specify the station from which transactions occurred. | ||
|
Show Trades As |
Allows you to indicate whether trades should be treated as tender, goods, or something else. | ||
|
Item Number |
Allows you to specify an item number. | ||
|
Group By…. |
Allows you to specify how the results will be grouped, if at all. You can only group by up to four groupings. | ||
|
|
| ||
|
Exclude Empty Sales |
Allows you to exclude sales that had no financial transaction. | ||
|
Use Report Criteria Cover Page |
Checked by default, can be unchecked to run just this report in this instance without the criteria cover page. For more about the report criteria cover page, see the section entitled Working with Report Results. |
4. Select output options from the right side of the screen as desired:
•Grouping and sorting parameters
•Whether to show cost
•Whether to show photos
•Whether to show short version or long version
•Whether to show just summaries or include line items
•Whether to provide a preview of where page breaks will be when printed automatically default on.
5. Select OK. The report will appear.
|
|
Some reports may take some time to compile. Do not interrupt the task until the report appears. |
|
|
The Presets function allows you to predefine reports. For example, you could create a series of month-end reports. |

