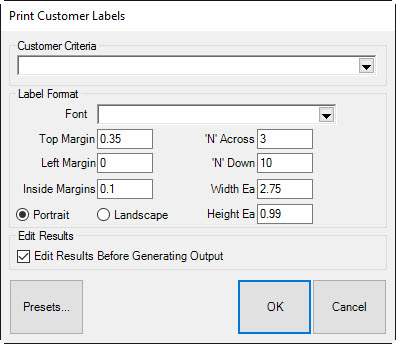
Using The Edge's powerful customer find filter, you can generate mailing labels for all customers in the system or for a specific selection (e.g., those who have purchased diamonds within the last year). For a video tutorial about working with customer filters, go to http://www.screencast.com/t/MkdH1e7iQmqR.
To begin creating mailing labels:
1. Select Labels from the Customer function menu. The Print Customer Labels window will appear.

2. Select the Customer Criteria drop-down menu to access the Customer Find feature. Select criteria for the mailing list much as you would in finding a customer record as described in the section entitled Finding a Customer. Narrow your criteria by entering as much information as is desired. Use the Results tab to specify what name to use as the addressee for this mailing. This tab is very useful in narrowing down your results and gives you a good degree of control in selecting specific lists of customers. For example, you could use this to target the husbands of all married women who have a birthday next month. Be sure to check the default format options as described below before you select the customer list.
|
|
Selecting OK without entering any criteria will prompt The Edge to prepare mailing labels for everyone that has a preferred mailing address. A mailing will not include customers without a preferred mailing address. |
3. Use the fields in the Label Format area to format the label.
|
Nacross |
The number of labels that run across the printed page. |
|
Width Ea |
The width of each label. |
|
Left Margin |
The left margin of the page. |
|
Ndown |
The number of labels that run down the printed page. |
|
Height Ea |
The height of each label. |
|
Top Margin |
The top margin of the page. |
|
Inside Margins |
The margin on each edge of each label. |
|
Portrait |
Indicates that the page containing the labels is in portrait orientation, i.e., taller than it is wide. |
|
Landscape |
Indicates that the page containing the labels is in landscape orientation, i.e., wider than it is tall. |
|
Font |
Returns a standard font dialog. |
|
|
The default format for mailing labels conforms to Avery 5160. |
4. Select OK. A list of customers to include will appear.
5. Check the ones you wish to print.
6. Select OK to preview the labels before they are printed.
7. Select the Print from the lower left corner of the preview window to print the labels or select Close to go back and edit the list.