|

|
The full physical inventory cycle is designed for
the entire store. The longer the inventory process takes, the more
potential for changes in quantities; this would result in more warnings
and require more attention when reconciliation actually takes place.
Scanning a portion of the store and going to Reconcile/Finish would
leave the rest of the store unreconciled and potentially considered
missing. |
To do a full physical inventory:
1. Select
Inventory ►Physical Inv. If you have RFID, you will be prompted to
confirm the action and indicate whether you wish to work with RFID only.
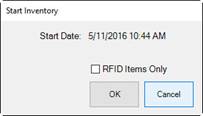
2. If
applicable, indicate that you want to work with only RFID items.
|

|
Bulk items will not scan in RFID Only
mode. |
3. Select
OK. The Physical Inventory window will appear.

The Physical Inventory
window is divided into four sections:
•
The top part is for setting inventory input type, entering item numbers,
and managing other settings.
•
The first window provides a list view of inventory as it is scanned or
entered.
•
The second window provides a picture view of items scanned and added to
the results.
•
The third window provides a picture view of items not yet scanned but
expected to be at the selected location. As items are inventoried, The
Edge moves them from the third window to the second window.
Note that you can collapse or
expand these windows using the controls on the left. Specific fields and
options in the Physical Inventory window include:
|
Scanning |
Indicates input methods: |
|
|
Item Number |
By input to the keyboard in the form of the item number
that appears on the tag. |
|
|
Item Barcode |
By barcode scan. |
|
|
Old Item Number |
By keyboard entry; a stock number produced by another
system. |
|
|
Old Barcode |
By scan of a barcode from a previous system. |
|
|
Old Item Number with Duplicates |
In The Edge, item numbers are always unique (except for
bulk). Legacy systems may not have been unique, so The Edge offers
this option to allow for duplicates without generating an error. |
|
|
Old Barcode with Duplicates |
In The Edge, barcodes are always unique (except for
bulk). Legacy systems may not have been unique, so The Edge offers
this option to allow for duplicates without generating an error. |
|
|
Vendor Barcode with Duplicates |
Because vendor barcodes may not be unique, The Edge
offers this option to allow for duplicates without generating an
error. |
|
Item |
The value scanned or to allow for manual
entry. |
|
Location |
Allows you to select a specific location within the
store. While conducting inventory, The Edge will use this location
to ensure item records reflect the correct location. An item scanned
while at this location will be updated to reflect this. For more
about working with locations, see the section entitled Locations. Whether is field is required is
based on System Options. |
|
This Inventory Started On |
Indicates the date and time the in-progress physical
inventory began. Use it to help identify what inventory you’re
working in. It is automatically populated based on the date when you
started the inventory. |
|
Warn About Layaways |
Layaways are inventoried, but this warns when a layaway
item is scanned. |
|
Clear |
Clears the window. This does not clear the
inventory activity; it just refreshes the window. |
|
Close |
Items are saved as you scan. This closes the
Physical Inventory window. |
|
Print List |
Prints a hard copy list of the inventory. You
will be prompted to indicate which portion of the window to
print. |
|
Presets |
Presets allow you to save and access commonly used
output settings. See the section entitled The Edge Navigation Basics for
details. |
|
|
|
|
|
4. Select
the method of scanning, i.e., the field to be captured with the barcode scan, to
be used from the options described above.
5. If you
have opted to manually enter item numbers by keyboard, you should type them into
the Item field. If you are scanning items, note that the barcode
will appear in the Item field.
6. Enter
the location of the item in the store, such as CASE1 or WALL1, in the Location
drop-down. Depending on your System Options setup, this may be
required.
|

|
By conducting a physical inventory, you are
recording the physical location of the item. For example, if you
scan an item that The Edge has recorded as being in a different store, it
will be moved to the location you are scanning and a message will appear
on the window. Likewise, if at POS you attempt to sell an item from
a different store, The Edge will require an override to do so.
|
7. Select
the Warn about Layaways option if you want to be notified about items on
layaway as you are preparing your inventory.
8. As you
scan barcodes or enter item numbers, a list will be generated on top portion of
the window showing all items entered. Each time an item that was
previously recorded in The Edge as in inventory is scanned, which appears in the
lower portion of the window, that item will be moved from lower portion to the
middle portion. Messages may appear indicating action taken or action to
be taken. Examples include:
|
“Item already inventoried.” |
This appears if you scan an item twice. |
|
“Not a valid item number.” |
This appears if an item number or barcode is not found
in the system. You'll need to research this and check the
tag. |
|
“Item should not be here.” |
This appears if an item has a status other than In-Stock; you should check the
item record to see what and where it should be. |
|
“Item SKU not unique.” |
This appears when a non-bulk, but non-unique item is
found. Research the item record and make sure it has a unique item
number. A new tag might be needed. |
|
“Item in another location.” |
This appears if an item is recorded as being in another
store. The item will be moved to the scanned store and The Edge will
record the item as scanned. |

Fields and options in the inventory
detail portion of the window are as follows:
|
Scanned |
The actual data you entered. |
|
Item Number |
The ID of the item corresponding with the data
entered. |
|
This Time |
Date and time of scan of this item for this
inventory. |
|
Last Time |
Date and time of scan at last inventory. |
|
Location |
Location of the item. Notes concerning location
will appear in separate entry. |
|
Qty |
The quantity of the item scanned so far. |
|
Units |
If a unit of measure bulk item, the number of
units. |
9. If you
encounter an error or unexpected result, set the item aside for resolution
during the reconciliation phase.
10. After all
items in the location are scanned, view the lower portion of the window to see
what items are unaccounted for. You can print a list periodically for
ready reference.
|
|
You may stop and start the inventory as many times
as necessary. Go to Inventory ► Physical Inv. ► Continue Inventory
at any time. |