To create a new appointment:
1. Select Associate ► Appointments ► Add. The Add Appointment window will appear.
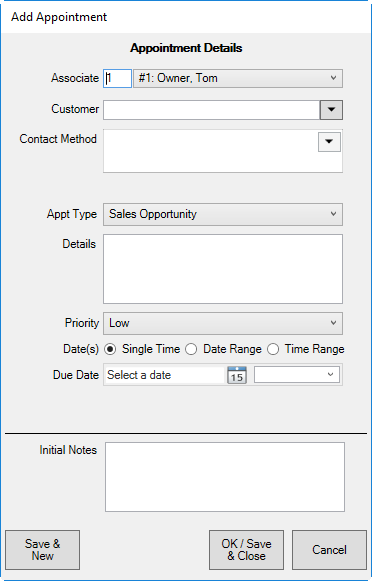
Fields and options in the Add Appointment window include:
|
Associate |
Offers the Associate drop-down menu; use it to assign the task or appointment to an associate. |
|
Customer |
Offers the customer find filter to indicate the customer. This is required to proceed with further contact information. |
|
Contact Method |
Offers the method of contact options for the selected customer: •Phone •In Person.
For each contact type, there may be more than one contact method. Select the correct phone number email address, or store location. |
|
Appointment Type |
Allows you to categorize appointments by type: •Registry •Service •Wish List •Sales Opportunity. |
|
Details |
Allows you to record details about the task. It should be a succinct description of the task as it will appear in the list view. |
|
Priority |
Indicates the priority of the contact on a scale of High, Medium, or Low. |
|
Dates |
You have the option to enter a specific, single time to fulfill the appointment, enter a date range, or enter a time range on a particular date. The options for entering those details change according which radio button you select: •Single Time: Select a date from the date picker and select a time in 30-minute intervals from the drop-down menu. •Date Range: Begin Date and End Date fields will be offered; select accordingly. No time frame is recorded, but The Edge will store the time as 12:00 a.m. •Time Range: Begin and end dates will be offered, but you can also pick times. |
|
Initial Notes |
Notes concerning the purpose of the contact, information about items or transactions to be discussed, etc. There is space to be detailed here; you can include item numbers, descriptions, etc. This information will not appear in the History area of the appointment record. |
2. Select an associate.
3. Select a customer.
4. Select the Contact Method drop-down menu. The Customer Contact window will appear.
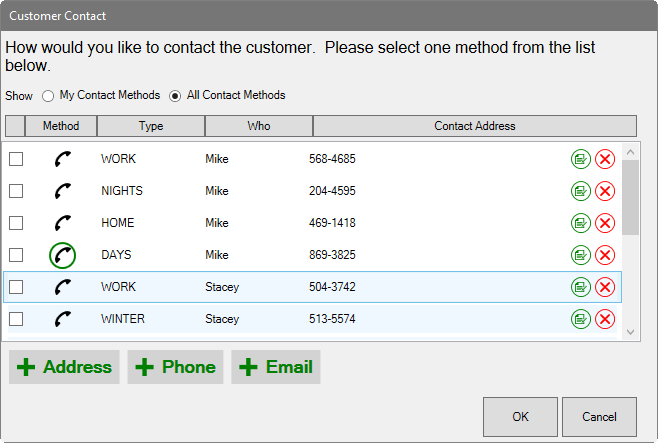
5. Select the type of contact with the desired value from the available options.
6. Select OK. You will be returned to the Add Appointment window. The Contact Method and Contact Address will be populated.
7. Complete the remaining fields and select OK/Save & Close. The appointment will be saved and the window will close.
8. When you are ready to act on the appointment, find it as described in the section entitled Finding and Editing an Appointment.