•No two in-stock items can have the same RFID tag.
•You cannot save a tag that is saved to an item already without removing it from the old item first.
•Bulk items cannot have RFID tags assigned to them.
|
|
•No two in-stock items can have the same RFID tag. •You cannot save a tag that is saved to an item already without removing it from the old item first. •Bulk items cannot have RFID tags assigned to them.
|
To associate tags provided by your RFID hardware vendor with the item records in The Edge:
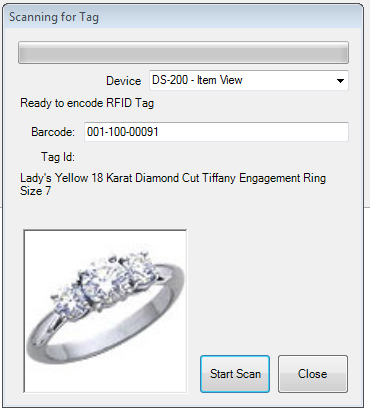
1. From the Inventory menu, select Tag RFID Items. The Scanning for Tag window will appear.

Fields and options in the Scanning for Tag window include:
|
Device |
Indicates the scanning device. |
|
Barcode |
The barcode of the item to be tagged. |
|
Tag ID |
The RFID tag number. |
|
Description |
A description of the item. |
|
Start Scan |
Allows you to scan the tag number. |
2. From the Device drop-down menu, select which device you are using to scan the tag.
3. Using a barcode reader, read or type in the barcode for the item to come up.
4. For some systems, place the item with the tag in the scanning box.
5. Select Start Scan button and scan the individual tag you want to assign to the item. The green bar will start moving across the form indicating that the tag reader is scanning. After the tag is registered, it will be assigned to the item and indicate the tag ID in the Tag Id field.
6. The form will pause for two seconds and then reset itself so you can repeat for additional items.
7. Close out of the form.
|
|
If a tag is already assigned to another in-stock item, you will be prompted to assign this tag to the current item and remove it from the other item. |
Alternatively, you can assign RFID tags to an item in two other ways:
1. Use Inventory ► Items ► Find to locate the item. From the search results, select Supervisor ► Assign RFID Tag.
2. From the item record select Supervisor ► Assign RFID Tag.