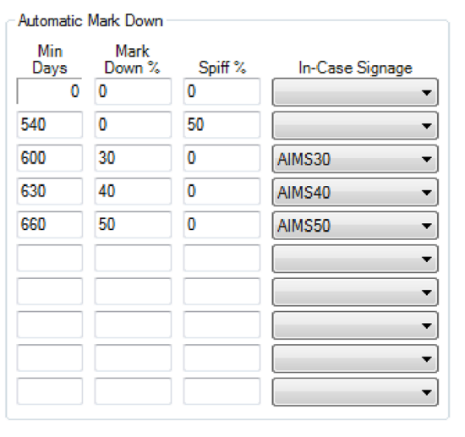
At the heart of automatic buying tools is the Automatic Mark Down table found on the Pricing tab of each category. The Mark Down table is used to define mark down amounts based on aging and should be setup for each participating category. Repricing goes through and applies the mark downs to selected items.
To setup the Automatic Mark Down table:
1. Select Inventory ► Categories ► List.
2. Select the category and edit it.
3. Select the Pricing tab and look at the Automatic Mark Down table on the right.

Fields in this table include:
|
Min Days |
Number of days an item must be in inventory before assigned the prescribed action. |
|
Mark Down % |
Percentage to discount from item’s retail price. |
|
Spiff % |
Percentage of profit to award an associate as commission for the sale of this item. Spiff supersedes commission. |
|
In-Case Signage |
Specify a sign template to use to generate a sign when this action taken (e.g., generate in-case sale signs to accompany items placed on sale). |
4. Setup the table as desired for each participating category. Use the Copy From button in the top right to copy the pricing tables from another category to the category currently being edited.
The example mark down table provided here shows our default setup.

Using this example, an item is considered old when it becomes 540 days old. At this point, a spiff of 50 percent is assigned. This means that if an associate sells this item they are assigned a commission of 50 percent of the profit generated.
When the item reaches 600 days old, the spiff is removed and a mark down of 30 percent is applied against the retail price. Also, a sign is queued for print using the “AIMS30” sign template.
When the item reaches 630 days old, the mark down changes from 30 percent to 40 percent and a new sign is generated using the “AIMS40” sign template. Finally, when the item reaches 660 days old, the mark down changes from 40 percent to 50 percent and a new sign is generated using the “AIMS50” sign template.
|
|
The spiff and mark downs do not happen without user intervention. Repricing must be initiated with the Buying Tools options enabled. |
Repricing must be run with either from the Reprice area from the Administrative menu or run as part of the larger monthly AIMS process. While this can be done at any time, it is recommended this be done once per month in a consistent cycle (e.g., first Monday of every month).
To initiate a standalone AIMS repricing:
1. Select Administrative ► Reprice Items.
2. Select the Item Filter to specify inventory to include/exclude based on category, vendor, inventory type, etc. Alternatively, leave this blank to include all qualifying items.
3. Select the default settings for each Change pricing section (i.e., Change Cost, Change Retail, Change Lowest Price, and Change Current Price). The defaults are as follows.
|
Change Cost |
No change. |
|
Change Retail |
No change. |
|
Change Lowest Price |
No change. |
|
Change Current Price |
Retail x Age Markdown Check do Signage and spiff Check Auto-price items only |
4. Select OK. A preview list of items eligible for automatic mark down will be presented. The list will show each qualifying item along with pertinent details including the old and new pricing information.
5. Select the items to reprice and select OK to finalize the repricing.
|
|
•In-case signage will be queued for print any time a sign template is assigned to a markdown. Select Inventory ► Print Signage to view and print these signs. •See the section entitled Sign Formats for more information on working with sign templates. | ||
|
|
|
For repricing, there is no undo. Consider printing and retaining the repricing preview list. | |