Bulk inventory scanning works very much like above, with a few more steps. To do so:
1. Conduct inventory scanning as described above. Be sure to leave RFID Items Only unchecked.
2. If the item number you enter is a bulk item number, the Bulk Count window will appear.
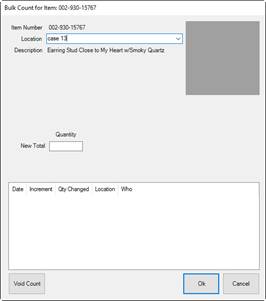
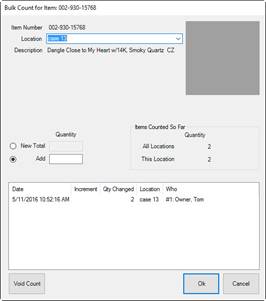
The window on the left is an example of the first scan of a bulk item, where you specify the first quantity counted. The window on the right shows the same item scanned again where you can either create a new total or add quantity. Fields and options in the Bulk Count window change depending on activity and the type of bulk item. As shown above, as you adjust quantities, additional fields appear.
Fields may include:
|
Item Number |
The item number scanned. |
| |||||||||
|
Location |
The location where the items was scanned; this is populated by The Edge based on the information in the Physical Inventory window. If you want to use this field add inventory to a different location, select the new location from the drop-down menu and enter the amount in the New Total field. |
| |||||||||
|
Description |
The description of the item from the item record. |
| |||||||||
|
Quantity |
Used for bulk items measured by count (or count and measure) such as SKU/UPC, IUOM, and PRE. |
| |||||||||
|
|
New Total |
Used to enter an entirely new total, rather than adding on to an existing count. |
| ||||||||
|
|
Add |
Used to add a quantity to the existing count. |
| ||||||||
|
Units |
Used for bulk items that are measured by unit such as UOM and IUOM. |
| |||||||||
|
|
New Total |
Used to enter an entirely new total, rather than adding on to an existing count. |
| ||||||||
|
|
Add |
Used to add a quantity to the existing count. |
| ||||||||
|
Items Counted So Far |
|
| |||||||||
|
|
Quantity All Locations |
Contains the total currently counted. | |||||||||
|
|
Quantity This Location |
If Location is selected on the Physical Inventory window, this will indicate the quantity currently counted for the location. | |||||||||
|
History |
This window indicates all the previous counts for this bulk item during the current inventory period. |
| |||||||||
|
|
Date |
The date the count was made. |
| ||||||||
|
|
Increment |
Whether the change included an increment in the count. |
| ||||||||
|
|
Qty Changed |
The amount by which the count changed. |
| ||||||||
|
|
Location |
The location where the change was made. |
| ||||||||
|
|
Who |
The associate who made the change. |
| ||||||||
|
Void Count |
Used to void a count row from the History window. If you do this, the total will update. This cannot be undone. |
| |||||||||
|
|
When scanning IUOM and PRE inventory, it is important to scan each piece individually to account for both unit of measure and quantity. If you scan one and enter multiple quantities, it will not account for volume. If you scan one and enter a total volume, it won't account for quantity. You must do both. |
3. Change the quantity to reflect what the system has recorded versus what you have in the location. Depending on the unit of measure, you may be required to enter units as well as quantity. If you have none, enter a 0 for New Total. To account for mislabeled or erroneous data, you can use negative numbers in the Add field.
4. Select OK. The record will appear in the Physical Inventory window.

