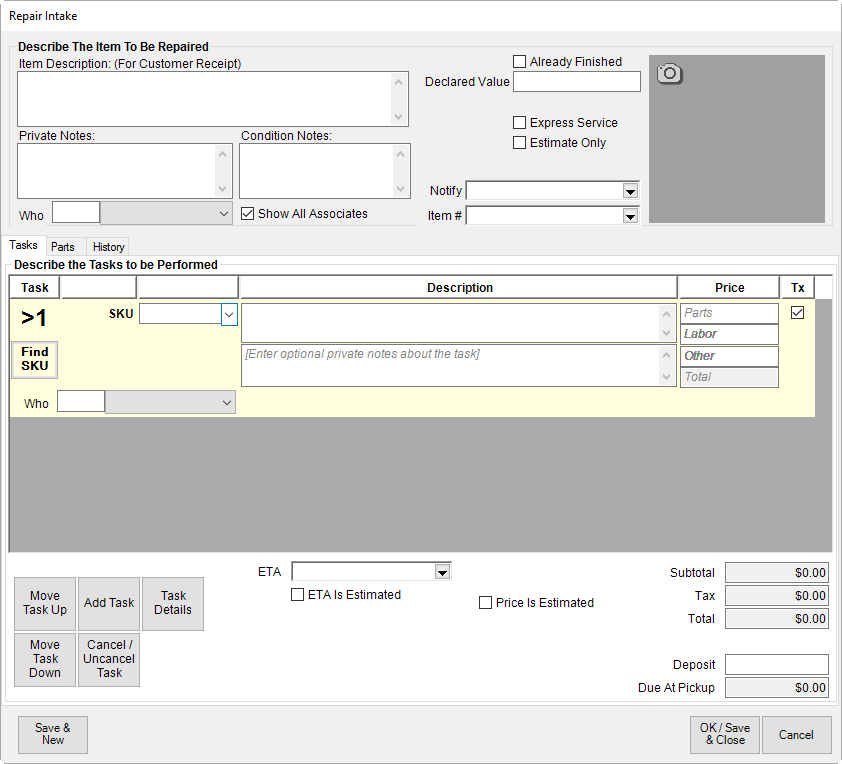
Found on the lower half of the Repair Intake window, the Tasks tab is one of three sections in the Repair Intake window used to collect repair instructions and information. At least one task must be entered.
To complete the Tasks portion of the Repair Intake window:
1. Select the Tasks tab.
Task lines can be slimmed down to allow more lines to fit on the window. This is a setting in System Options. If you have that turned on, use the Task Details button to see the information that would be on the full-sized task line.

2. Type in a SKU or select Find SKU to search the SKU database. Or select the SKU drop-down menu for a list of frequently-used SKUs. Alternatively, you can bypass the SKU field and manually enter your task details and pricing information. To find a SKU in the database:
a. Select Find SKU. The SKU Lookup window will appear.
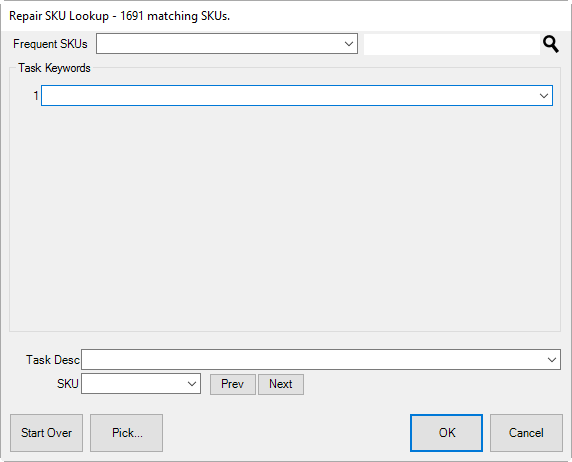
b. Select from the Frequent SKUs drop-down menu.
c. Search for a SKU from the search field (indicated by the magnifying glass icon).
d. Type in a Task Keyword or choose from the drop-down list.
e. After a Task Keyword has been selected, you may enter a second Task Keyword or enter a Task Description manually or by using the drop-down list.
f. In addition, you may browse through SKUs by using the Prev and Next buttons to view SKUs currently in the system.
g. Select the desired SKU.
|
|
Selecting Pick… will bring up a list of all matching Repair SKUs in the system. |
h. Select OK.
3. The task details will be retrieved from the database of repair tasks and the other fields on the task line will be pre-filled from the database. Note that dollar amounts will automatically be listed for price, labor, and additional price. Select whether tax is applicable by checking the box next to each item.
4. To add another repair task to the item, select Add Task. A second task line will appear to be completed as above.
5. To cancel a previously entered task, which was already saved, select Cancel/Uncancel Task. This will also remove the cancel date and renew the task if selected again.
6. To change the order in which a task appears on the list, select the Move Task Up or Move Task Down buttons from the bottom portion of the Repair Intake window.
7. To enter more specific details about a task, select Task Details. The Repair Task Detail window will appear.
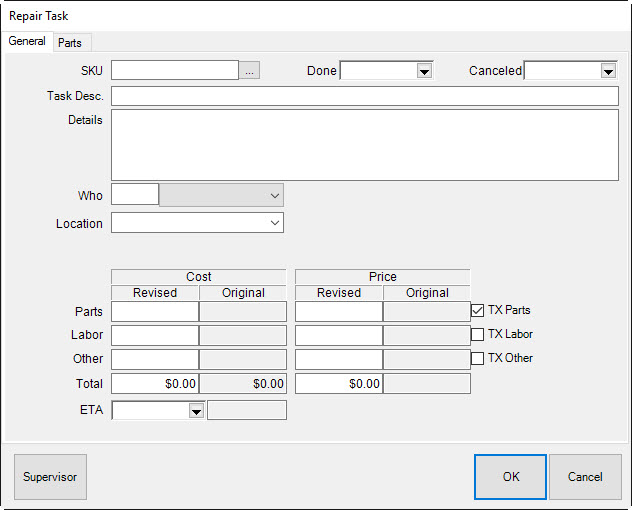
The General tab allows you to enter more detailed information about the repair. There are two tabs on this window. Fields and options in the General tab include:
|
SKU |
Enter or browse for a SKU appropriate for this task. |
|
Done |
Use the drop-down list to enter a completion date. |
|
Canceled |
Use the drop-down list to enter a cancellation date. |
|
Task Desc |
A description of this task. |
|
Details |
Enter any notes about the task that might assist the technician. |
|
Who |
Enter the associate ID number of the repair technician to whom the task was or is assigned. |
|
Where |
Enter the workstation or outside location where the task was or is to be performed. |
|
Cost |
The following fields apply to cost. |
|
Revised Parts |
Enter the updated cost to the store for parts. |
|
Revised Labor |
Enter the updated cost to the store for labor. |
|
Revised Other |
Enter the updated cost to the store for other repair expenses (shipping, etc.). |
|
Revised Total |
Enter the updated total cost to the store. |
|
Original Parts |
Contains the original cost to the store for parts. |
|
Original Labor |
Contains the original cost to the store for labor. |
|
Original Other |
Contains the original cost to the store for other expenses. |
|
Original Total |
Contains the original total cost to the store. |
|
Price |
The following fields apply to price. |
|
Revised Parts |
Enter the updated price to the customer for parts. |
|
Revised Labor |
Enter the updated price to the customer for labor. |
|
Revised Other |
Enter the updated price to the customer for other expenses. |
|
Revised Total |
Enter the updated total price to the customer. |
|
Original Parts |
Contains the original price to the customer for parts. |
|
Original Labor |
Contains the original price to the customer for labor. |
|
Original Other |
Contains the original price to the customer for other expenses. |
|
Original Total |
Contains the original total price to the customer. |
|
|
The Revised fields offer entry fields for original data if this is a new task or for an update if task expectations change. The Original fields will be empty the first time the task is entered, but will contain values if the record is changed. |
|
TX Parts |
Whether the price of parts is to be taxed. |
|
TX Labor |
Whether the price of labor is to be taxed. |
|
TX Other |
Whether the price of other expenses is to be taxed. |
|
ETA |
Use the drop-down list to select a date that the task should be completed. |
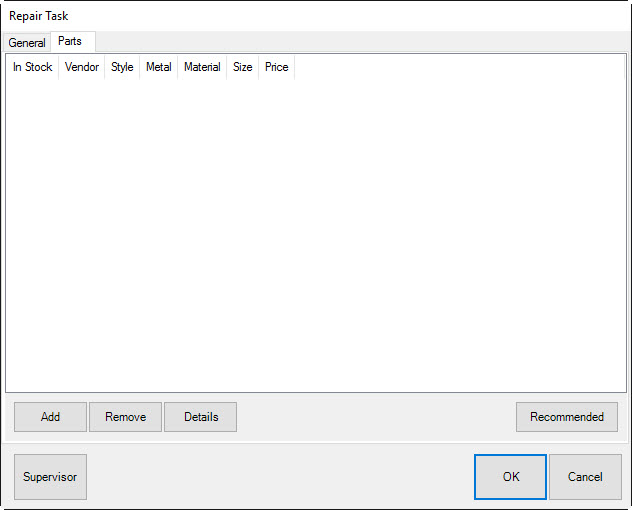
In the Parts tab of the Task Details window, parts for the task will be listed. Fields and options in the Parts tab include:
|
In Stock |
Indicates whether the part is available in-house or must be ordered. |
|
Vendor |
The vendor from whom the part was or is to be ordered. |
|
Style |
The style number for the part. |
|
Metal |
The type of metal of which the part is made. |
|
Material |
The material of which the part is made. |
|
Size |
The part size required for the repair. |
|
Price |
The price of the part to the customer. |
|
Add |
Allows you to add a part to the task in a separate window that contains fields similar to those listed above as well as others. |
|
Task# |
Parts are assigned to tasks rather than the repair in general. This is the task for which this part is needed. |
|
Item# |
If the part is an item in the store’s inventory, the SKU to be taken out of inventory and used in this task. |
|
Remove |
Remove a part from the task. |
|
Details |
Contains part details. |
|
Recommended |
Offers a list of recommended parts. This information can also be found in the Parts tab in the Task Details area of the Repair Intake window. |
|
|
With IUOM and PRE inventory used as parts, it is important to treat consumption for service jobs to account for both the amount (ct, grams, etc.) and the quantity (1 diamond, 1 piece, etc.). For service, it means creating a part line for each part and enter the unit of measure. For example, if you use three .10-ct diamonds for a job, you must specify this by adding three separate parts, each being .10 carats. Do not add one part of .30 carats as this would not properly reduce the physical quantity available in stock and your resulting inventory would be off. |
|
|
Details about parts used in the repair can also be viewed by selecting the Parts tab from the bottom half of the Repair Intake window. |
8. Add parts by selecting Add from the Parts tab of the Repair Details window. The New Part window will appear.
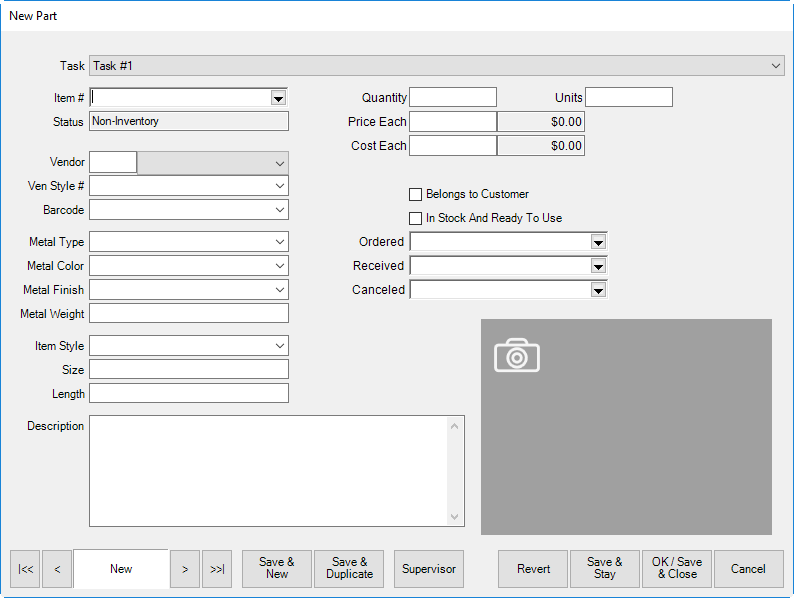
Fields and options in the New Part window include:
|
Task |
The task number in the repair and its description. |
| ||||
|
Item # |
The item ID, if the item is sold in the store. |
| ||||
|
Vendor |
The vendor ID. |
| ||||
|
Ven Style# |
The vendor’s style number or SKU for the item. |
| ||||
|
Barcode |
The barcode for the item, if it is sold in the store. |
| ||||
|
Metal Type |
The type of metal the item is made of, if applicable. |
| ||||
|
Metal Color |
The color of the metal, if applicable. |
| ||||
|
Metal Weight |
The metal weight of the item. |
| ||||
|
Item Style |
The style of the part. |
| ||||
|
Size |
The size of the part. |
| ||||
|
Length |
The length of the part, if applicable. |
| ||||
|
Description |
A description of the part. |
| ||||
|
Quantity |
How many of the part is required. |
| ||||
|
UOM |
How the parts are quantified, e.g., each, per ounce, per inch, etc. |
| ||||
|
Price Each |
The price to the customer for each unit of measure. |
| ||||
|
Cost Each |
The cost to the store for each unit of measure. |
| ||||
|
Belongs to Customer |
The part is provided by the customer for use in the job. If checked, the price of the part will be hidden.
|
| ||||
|
In Stock and Ready to Use |
The part is readily available. | |||||
|
Ordered |
When the part was ordered. This must be done in purchasing. | |||||
|
Received |
When the part was received. | |||||
|
Canceled |
If and when the part order was canceled.
| |||||
9. Enter an estimated time of arrival in the ETA field or select a date from the drop-down calendar. If estimated time of arrival is estimated, select ETA is Estimated.
10. After a task is entered, a price will be listed at the left of the window. If this price is estimated, select the Price is Estimated box. When selected, this box will ask you to choose from the following:
•To Be Determined
•Call Before Starting
•Do Not Exceed…
Select all that are appropriate by checking the boxes. If Do Not Exceed… is selected, a dollar amount must be entered into the adjoining field.


