To create a new sign format:
1. To create a new sign layout, select Add from the Sales Sign Definitions window. The New Sign window will appear.
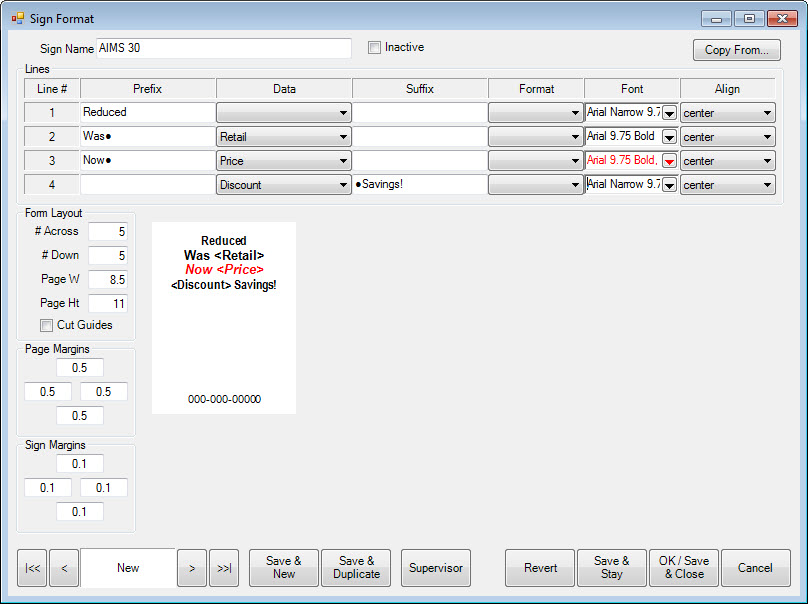
The options shown here are The Edge defaults and are designed to work for the forms available from an Edge partner supplier. Options for sign layout include:
|
Sign Name |
The name for the layout for future use. |
| ||
|
Copy From |
Copies the information from another sign layout. |
| ||
|
Lines |
As if working down the page, takes the text and data to appear on each line of the sign. Fields include: |
| ||
|
|
Line # |
The line for which content is being defined. | ||
|
|
Prefix |
Static text to appear at the beginning of the line. For example: Sale, Clearance, Reduced, etc. | ||
|
|
Data |
Variable data to appear after the prefix. | ||
|
|
Suffix |
Static text to appear at the end of the line. For example: Off. | ||
|
|
Format |
Options for how numerical data should be presented. | ||
|
|
Font |
Offers a standard font and color selection dialog for each line. | ||
|
|
Align |
Options for centering or justifying text on the line. | ||
|
Form Layout |
Contains layout options:
# Across: The number of signs across the printed page # Down: The number of signs down the printed page Page W: The width of the page in inches Page Ht: The length of the page in inches Cut Guides: Whether to show cutting guides. |
| ||
|
|
| |||
|
|
| |||
|
|
| |||
|
|
| |||
|
Page Margins |
Contains options for margins around the outside of the printed page |
| ||
|
Sign Margins |
Contains options for margins between signs laid out on the page. |
| ||
Note that there is a preview of the sign based on the form definitions. In addition, there is a scroll option on the Record Navigation Bar for easy access to other sign definitions, which can be copied and modified.
2. Make changes to the default sizes or margins as desired.
3. Begin composing content by selecting a line number.
4. Enter text for the prefix to the data that might appear on the line.
5. Select the type of data to appear from the drop-down list: Retail, Price, or Discount.
6. Enter text that would follow the data.
7. Select a format for the data. For example, for a monetary amount, do you want a dollar sign to appear, do you want only whole dollar amounts or cents, too?
8. Select a font using the font dialog. Remember, it just applies to the current line.
9. Select an alignment: left, right, center, fit. Fit will cause the system to override the value set in the font dialog and make the text fit on the line.
10. Select a new line number and repeat steps 3 through 9 for each line of text.
11. To quickly move from line to line, click on that line on the small preview window.
12. Select a save option from the Record Navigation Bar.
|
|
Once sign formats are defined, they can be employed by selecting a format from Admin ► Start a Sale or Categories ► List ► Edit ► Pricing ► Automatic Markdown. |
