
Some web-based email applications such as Yahoo mail, Hotmail, AOL mail may not work well from within The Edge.

If you complete the email settings for Customer Marketing first, you can copy those settings to this area.
To send email receipts and job details sheets, The Edge must be configured to use the email settings associated with your store email account. The fields marked with an asterisk below are specific to your email account. You should contact your email vendor or ISP (Internet service provider) and ask them specifically for this information.
|
|
Some web-based email applications such as Yahoo mail, Hotmail, AOL mail may not work well from within The Edge. |
|
|
If you complete the email settings for Customer Marketing first, you can copy those settings to this area. |
The Edge email server must be configured to send messages. To do so:
1. Select Administrative ► Email Settings ► Receipts/Job Details. The Email Receipt/Job Details Settings window will appear.
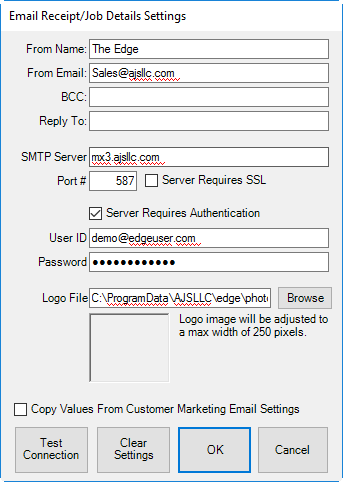
Fields and options to complete in the Email Receipt/Job Details Settings window include:
|
From Name |
The name that you want to appear as the sender of the receipt. This will probably be your store name. This also serves as the “reply to” email address. |
|
From Email |
The email address from which the receipt is being sent. This will be your store email account. |
|
SMTP Server* |
The outbound server as provided by your email provider. It will probably be an SMTP account. |
|
Port #* |
The port number with which your email interacts. |
|
Server Requires SSL* |
Whether the outgoing server requires a secure socket layer. |
|
Server Requires Authentication* |
Whether the outgoing server requires authentication. |
|
User ID* |
The email account’s user ID. |
|
Password* |
The password for the email account. |
|
Logo File/Browse |
Optionally you can supply a logo file (image) containing your store’s logo. If you do, the image will appear at the top of the email receipt
|
|
Copy Values from Customer Marketing Email Settings |
Allows you to copy the settings you used in setting up customer marketing emails as discussed in the section entitled Configuring Email Settings for Customer Marketing. |
|
Test Connection |
Sends a ping though the system to make sure settings are correct. |
|
Clear Settings |
Allows you to clear email settings, which will effectively disable automated emails. |
2. Complete these fields with user and server settings (SMTP) provided by your email provider.
3. Select Test Connection to have a test email sent to you to verify set up is correct.
4. Select OK.