
•Adjustments made to repair or custom jobs do not change the status of the job to open.
•If a repair is adjusted, the adjustment cannot be voided later.
Occasionally, it may be necessary to make adjustments to repair or custom jobs that are already marked as picked up. These adjustments could be simple monetary changes (refunding money or collecting more) or could be changes such as adding tasks or parts. Here are a couple examples.
Example 1. A customer decides some quick additional work is necessary, which is done while the customer waits when they bring the job back in. Additional tasks can quickly be added and charged for as an adjustment on the existing job.
Example 2. A customer is dissatisfied with work performed and you decide to refund the money paid. This could be done as an adjustment in a similar to performing a return of merchandise.
|
|
•Adjustments made to repair or custom jobs do not change the status of the job to open. •If a repair is adjusted, the adjustment cannot be voided later. |
The following steps will guide you through a simple adjustment to refund money to a customer:
1. From Point of Sale, locate the customer record.
2. Select Return/Adjust. A list of the customer’s activities will appear.
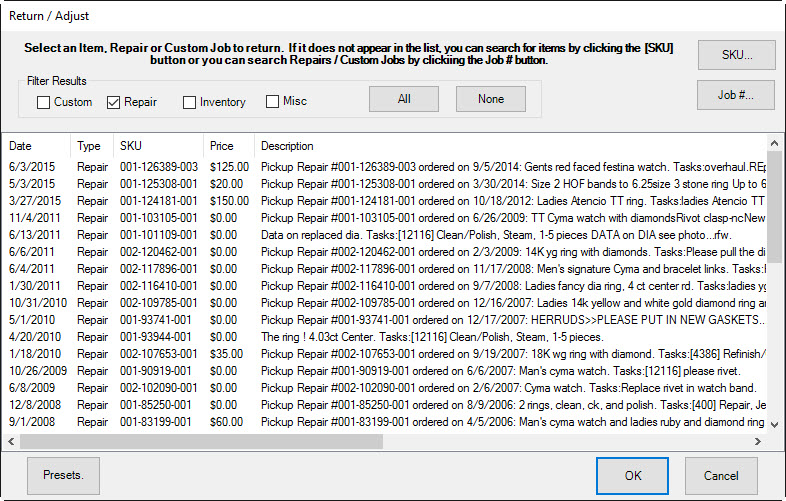
You can filter the results by item type, repair, or other transaction.
3. Find the repair in question and double click it or select it and select OK. The Point of Sale window will open the repair record.
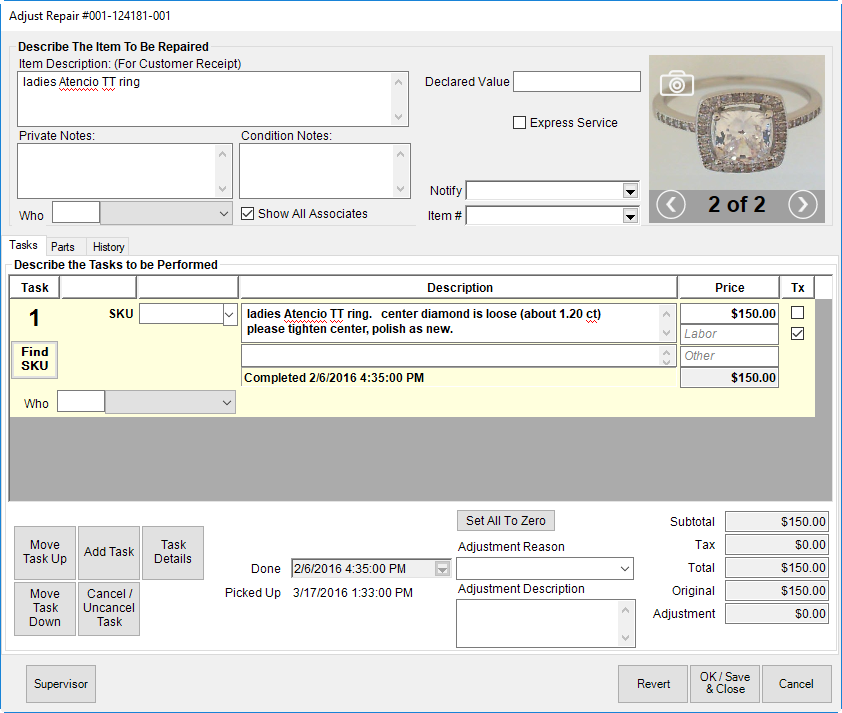
4. Change the Parts, Labor or Other price fields to reflect the amount being refunded. If the charges are being refunded in full, select Set All to Zero.
|
|
•All adjusted fields in the Adjust Repair will be highlighted in yellow. •Right click any adjusted field and choose original value to undo the adjustment. •Revert button will undo all adjustments on the window. •If the job was previously adjusted, “Previously Adjusted by (associate) and Date” will appear in red. •Original total and adjustment total will appear on the window. •Any money due back to or from the customer will be tendered at the Point of Sale window after saving the adjustment. |
5. Select a reason for the adjustment from the Adjustment Reason drop-down menu. This is required.
|
|
To modify Adjustment Reasons, go to Administrative ► Lists and edit the Repair/Adjustment Reason list. |
6. Enter a description in the Adjustment Description field. This is required.
|
|
This text from both the Adjustment Reason field and Adjustment Description field will appear on the customer’s receipt. |
7. To quickly refund everything and set all price amounts to zero, select Set All to Zero.
8. Select OK/Save & Close.
9. Continue with the other sales transactions as normal.
