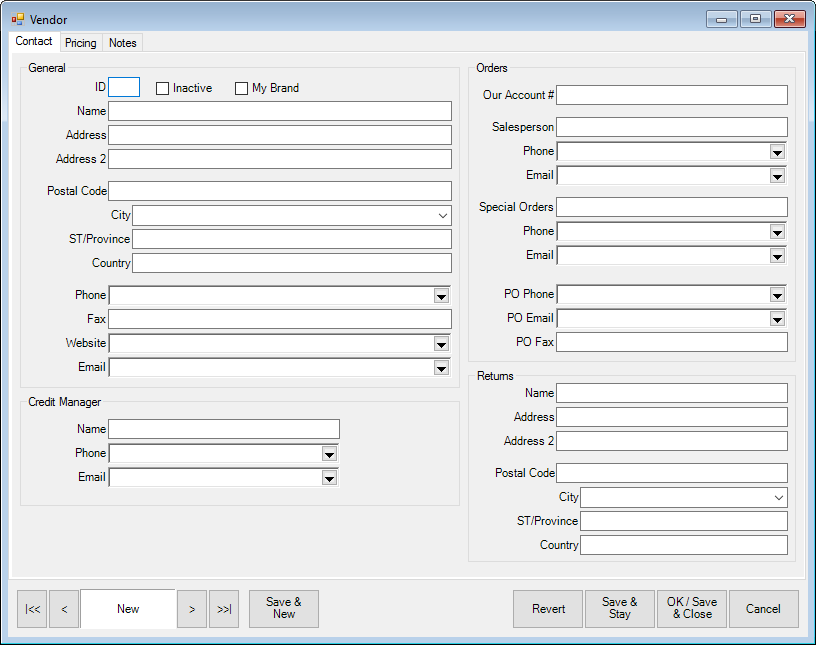
To add a new vendor to the system:
1. Select the Vendors ► Add from the Inventory menu. The Vendor window with the Contact tab selected will appear.
Fields and options in the Contact tab include:
|
General |
| |||||
|
|
ID |
Enter an ID number for the vendor. It may be up to three characters and can contain letters and numbers. |
| |||
|
|
Inactive |
Indicates that the vendor is inactive. If it is, the vendor will not appear in list views. |
| |||
|
|
My Brand |
Indicates that the vendor is a store or company brand; you might use this most for items that you build or assemble in-house. |
| |||
|
|
Name |
The company name of the vendor. |
| |||
|
|
Address |
The address for the vendor. |
| |||
|
|
Address 2 |
Additional address line for the vendor address. |
| |||
|
|
Postal Code |
The ZIP code for the vendor. |
| |||
|
|
City |
The city of the vendor. |
| |||
|
|
State/Province |
The state of the vendor. |
| |||
|
|
Country |
The country of the vendor. |
| |||
|
|
Phone |
The vendor’s phone number |
| |||
|
|
Fax |
The vendor’s fax number. |
| |||
|
|
Website |
The vendor’s website. |
| |||
|
|
|
The vendor’s email address. |
| |||
|
Credit Manager |
| |||||
|
|
Name |
The name of the credit manager for the vendor. |
| |||
|
|
Phone |
The direct phone number of the special order contact. |
| |||
|
|
|
The direct email of the special order contact. |
| |||
|
Orders |
| |||||
|
|
Our Account # |
Your account number with that vendor. | ||||
|
|
Salesperson |
The name of your salesperson or other contact person with that vendor. | ||||
|
|
Phone |
The direct phone number of your salesperson. | ||||
|
|
|
The direct email of your salesperson. | ||||
|
|
Special Orders |
The person to contact for special orders. | ||||
|
|
Phone |
The direct phone number of the special order contact. | ||||
|
|
|
The direct email of the special order contact. | ||||
|
Returns |
| |||||
|
|
Name |
The name of the vendor contact for returns. |
| |||
|
|
Address |
The street address of the vendor contact for returns. |
| |||
|
|
Address 2 |
The second line of the street address of the vendor contact for returns. |
| |||
|
|
Postal Code |
The postal code of the vendor contact for returns. |
| |||
|
|
City |
The city of the vendor contact for returns. |
| |||
|
|
ST/Province |
The state or province of the vendor contact for returns. |
| |||
|
|
Country |
The country of the vendor contact for returns. |
| |||
2. Enter contact information for the vendor, including ID, name, address, telephone and fax numbers, website, email, account number, and contact information for your salesperson, special orders, and the credit manager. Select My Brand to indicate that the vendor record is one of your own; this is necessary for build and assemble items.
|
|
Only Vendor ID and Vendor Name are required. The remaining fields are optional. |
3. Select the Pricing tab. The pricing tab will appear with a button that reads See Pricing.
4. Select See Pricing to enter pricing information.
|
|
Vendor pricing is not necessary for every vendor. This is only for vendors who have specific pricing rules that are different from those of the appropriate category. This option is offered as an alternative to creating a category for vendors who do have separate pricing rules. |
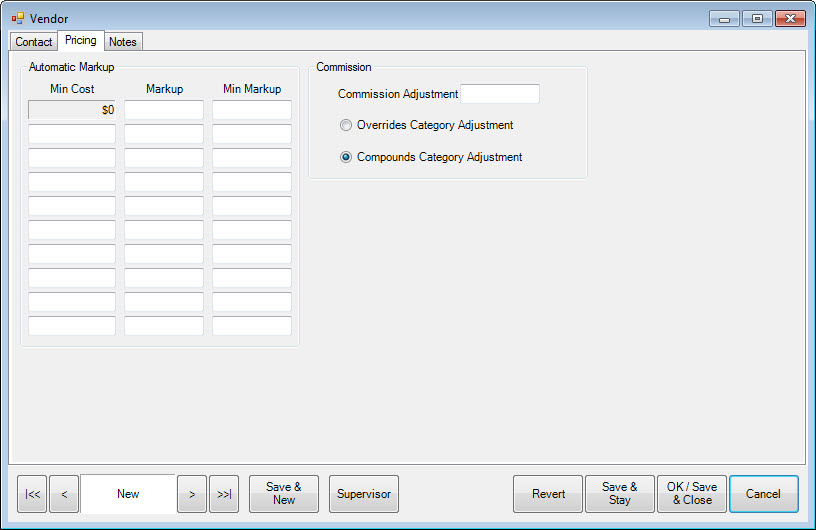
Fields and options in the Pricing tab include:
|
Automatic Markup |
Enables you to associate a predefined markup with this vendor that will override the markup assigned in the category. |
|
Commission Adjustment |
Represents an adjustment paid to an associate for selling an item from this vendor. If you enter 75 percent, the commission will be reduced by 25 percent. |
|
Overrides Category Adjustment |
Whether this commission adjustment overrides the adjustment listed in the category record. |
|
Compounds Category Adjustment |
Whether this commission adjustment is figured on top of the adjustment in the category record. |
5. Select the Notes tab to enter miscellaneous information about the vendor.
6. When all information has been entered, select a save option from the Record Navigation Bar.
