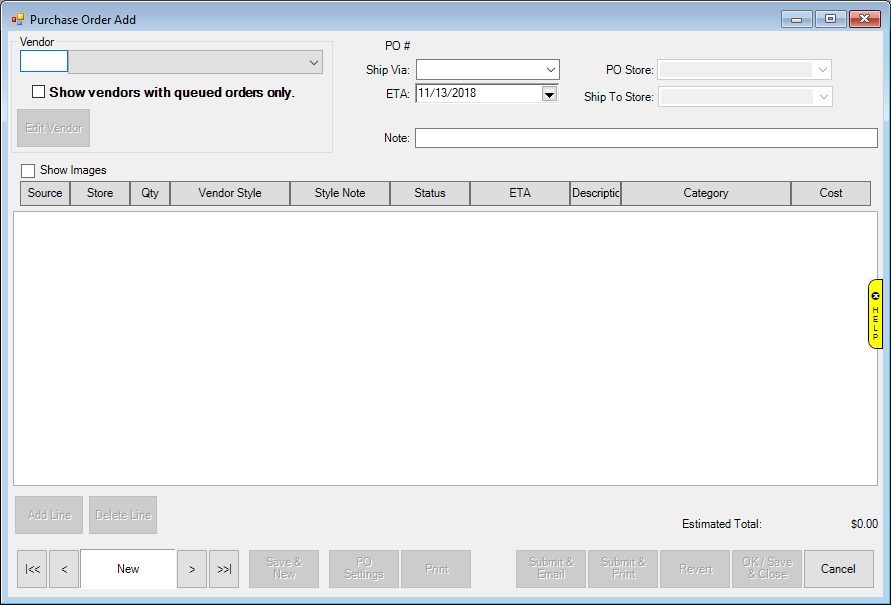
To create a new purchase order:
1. Select Inventory ► PO ► Add. The Purchase Order Add window will appear.
Fields and options in the Purchase Order Add window include:
|
Vendor |
The vendor to whom this purchase order will be submitted. |
|
|
Show vendors with queued orders only |
Enabled by default, populates the Vendor drop-down list with vendors who have open purchase orders. |
|
|
Edit Vendor |
Returns the vendor record so you can review details or make changes. The changes will be reflected immediately. |
|
|
Show Images |
Enables the image column on the window. It does not affect images on the purchase order when printed or emailed. | |
|
PO # |
The Edge-generated purchase order number; it will be created when the purchase order is saved. |
|
|
Ship Via |
The shipping method or carrier. Shipping methods can be managed from Administrative ► Lists. The list name is Shipping Methods. |
|
|
ETA |
The estimated date of arrival based on typical vendor delivery time. It cannot be earlier than the current date and cannot be changed after the purchase order is submitted. |
|
|
Date Ordered |
Shows the date the order was submitted. This will not appear until the purchase order has been submitted. |
|
|
Note |
Allows you to enter notes about the order. |
|
|
PO Store |
Multi-store only; assign this PO to a store. Leaving this blank will mark this PO as ‘Unassigned.’ It is not necessary to assign a PO to a store. |
|
|
Ship To Store |
Multi-store only; which store to ship the items to. This can differ from the PO Store. |
|
|
Add Line |
Allows you to add a line item to the purchase order. It is disabled after the purchase order is submitted. |
|
|
Delete Line |
Allows you to delete a line item from the purchase order. If the item came from the queued item list, it will be returned there. |
|
2. Select the vendor for this order. The Retrieve Queued Items and Special Orders window will appear. Note that if you choose a vendor for whom a purchase order exists, you will be prompted to open that purchase order and add items to it.
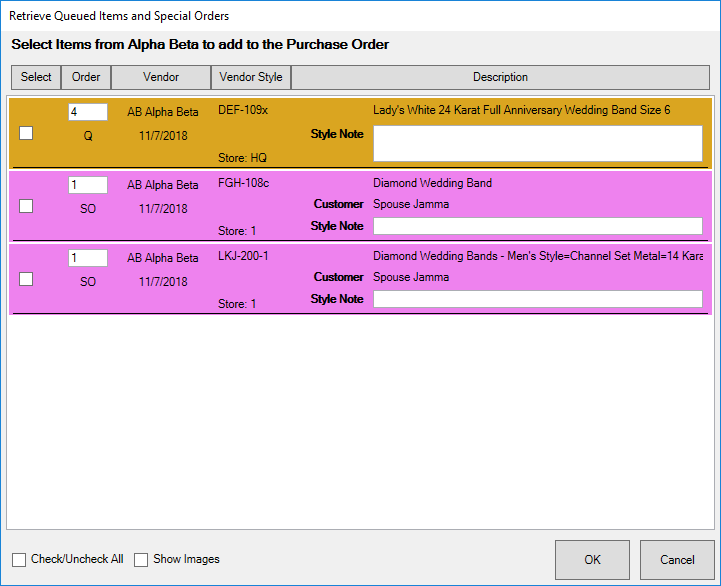
For the purposes of the Retrieve Queued window and the Purchase Order window, line items will be color-coded as follows:
|
Yellow |
Queued items |
|
Purple |
Special order items |
|
Dark Red |
Marked to be cancelled |
|
Red |
Cancelled |
|
Light Yellow |
Other |
|
Blue |
Selected |
|
Light blue |
Hovering |
3. Select the items to be added to the purchase order. From here you can only change quantity and cost.
4. Select OK. The Purchase Order Add window will be populated with the items.
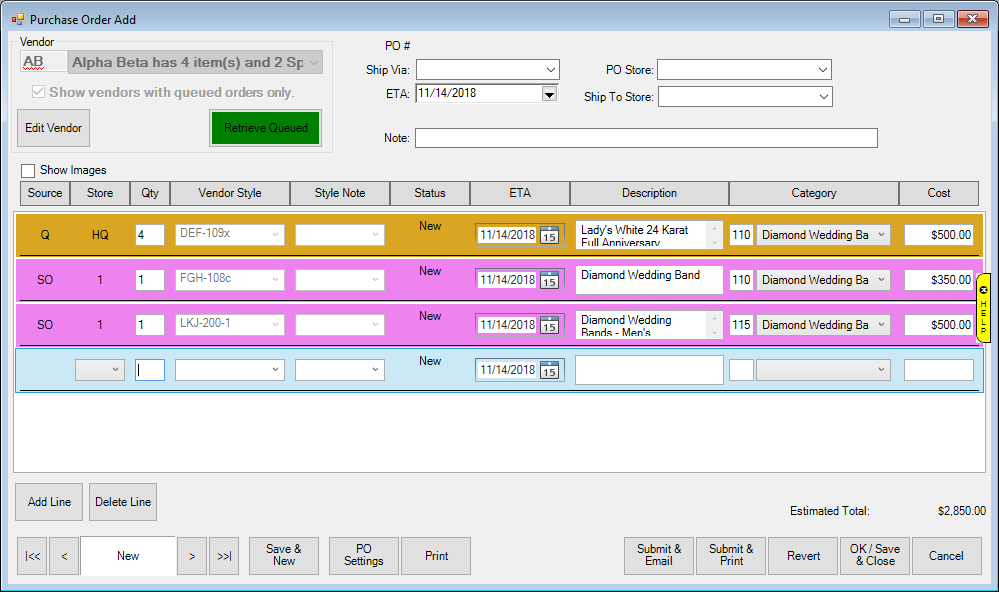
5. If needed, use Retrieve Queued to go back to the Retrieve Queued window and select more items.
6. Select a shipping method from the Ship via drop-down menu.
7. Enter notes in the Notes field to place a note on the order (optional).
8. Enter an estimated time of arrival in the ETA field. This can be set for the entire purchase order or for each item line.
9. To add more items, select Add Line. If this order is for a style that has been in stock before, select the vendor style from the drop-down menu. If this order is for a new style, type in its vendor style number and basic details. As a shortcut, you can scan item tags and special order envelopes to quickly create line items.
10. Multi-store only; each PO line has a Store drop-down allowing you to select a style for this line. It is possible to have different store numbers on each line if desired. When received, the inventory will allocate to the appropriate store.
11. Verify and correct data in each item line:
a. Image
b. Source
c. Quantity (must be greater than 0)
d. Style Code (required). You may be prompted to copy details from a previous item.
e. Status
f. ETA (must be later than the current date)
g. Description (required)
h. Category (required)
i. Cost per item (required).
12. Choose a save option:
a. Print Preview: Allows you to print a purchase order. This does not submit the purchase order. To do so, use Submit & Print.
b. Submit & Email: Saves the purchase order in The Edge as ordered and sends the purchase order by email to the vendor.
c. Submit & Print: Saves the purchase order in The Edge as ordered and sends the purchase order to the printer so you can fax or mail it to the vendor.
d. OK/Save & Close: Saves the purchase order to be worked on later. This does not submit the purchase order to the vendor or record it as such in The Edge.