
To add a new category to the system:
1. Select Categories ► Add from the Inventory menu. A blank category window will appear with the General tab selected.
Fields and options in the General tab include:
|
Inactive |
Indicates that the category should be considered inactive. It will no longer appear on any list views. |
|
ID, Name |
The ID number and name of the category. The ID must be numeric. |
|
Department |
The department to which you want this category to be assigned. |
|
Type |
The type of items to go into this category. |
|
Gender |
The gender for which the items are intended. |
|
Generic Description |
A brief description of the items that will be in this category. This will be included as part of the suggested description that is offered when entering an item. |
|
Commission Adjustment |
Any adjustment to commission that might be applied to sales of items in this category. The default setting of 100% specifies that an associate would receive their full commission percentage as dictated by the commission options on the associate’s record. |
|
Default Pricing Method for Items in this Category |
Defines the default pricing method to be applied to items added to this category. Options include: •Fine Jewelry, Individual Item Pricing •General Merchandise, UPC/SKU Pricing •Buy and Sell Item by Unit of Measure •Buy and Sell Item by Measure Only •Mixed Retail Pricing (PRE)
For fine jewelry pricing, The Edge will assign unique item numbers to each item. Other pricing methods apply to bulk inventory. For information regarding bulk setup and use, see the section entitled Bulk Inventory. |
|
Category Lead Time for Jobs |
If an item from this category is a build or assemble job, the default number of days estimated for completion. |
|
Exclude Category from Care Plan |
If you are offering care plans to your customers, checking this box will exclude items in this category from that offering. |
2. Complete the General tab fields as appropriate, and select the Pricing tab.

In the Pricing tab, you can indicate that certain categories are automatically marked up or down. Fields and options in the Pricing tab include:
|
Automatic Markup |
This section defines the markup to be applied to items in this category if automatic pricing is enabled. See the section entitled Inventory Options for additional information on enabling/disabling automatic pricing. Also, note that markup can also be specified at the vendor level if necessary. This will override the category markup. See the section entitled Adding a Vendor for additional information. |
| ||||||
|
|
Min Cost |
For items of the indicated minimum cost, treat as in the following fields. Note that these fields together, read vertically, constitute ranges for which the markup applies. To use a single markup for the entire category, it is only necessary to fill in the first row. However, this is not advisable as price points on performance reports are derived from this markup table. | ||||||
|
|
Markup |
The factor by which to set the retail price. Entering 3 would multiply the cost by a factor of 3. For example, if you enter 3, a $50 item would have a retail price set at $150. For any particular item, this can be overridden at the time of entry. | ||||||
|
|
Min Markup |
Defines the minimum price at which this item can be sold. If you attempt to sell the item for less than this price, you will be prompted for a manager override. So if 2 is entered here, a $50 item that should sell for $150 can sell for no less than $100 without approval. | ||||||
|
Automatic Mark Down |
This section defines an automatic markdown to be applied to inventory based on age for the purposes of reducing old inventory. The markdown is only applied to inventory if you initiate an inventory repricing. See the section entitled Reprice Items for more information. |
| ||||||
|
|
Min Days |
The minimum number of days for which the markdown applies. Note that these fields together, read vertically, constitute ranges for which the markdown applies. At 540 days, or roughly a year and a half, we suggest that a spiff be applied. See below. | ||||||
|
|
Mark Down % |
The percentage by which the items should be marked down. At 600 days, we suggest a markdown of 30% be applied. This means the $50 item retailing for $150 will now show a retail of $105. | ||||||
|
|
Spiff |
Any spiff, or percentage of profit, to be applied for the sale of an item in the category. We recommend that at Min Days of 540, spiff of 50 be entered. This provides the employee a bonus of half of the profit that was generated by the sale. On the $50 item that was selling for $150, a spiff of 50 would award the associate $50 as that is 50% of the $100 profit generated.
Using the spiff field here will cause the item to appear on Bonus Posters for associate reference. See the section entitled Bonus Poster for more information. | ||||||
|
|
In-Case Signage |
The sign to be displayed along with the items marked down. These signs are printed as described in the section entitled Printing Signage and designed as described in the section entitled Sign Formats.
| ||||||
3. Complete the Pricing tab fields as appropriate, and select the Details tab.

The Details tab allows you to provide the category with descriptors that apply only to it, such as the kind of strap on a watch, serial number, metal type, etc. These details will appear as fields when entering items into this category. Additionally, any detail created here can be printed on the tag. There are two groups of details, Group 1 and Group 2 to accommodate items that may have two parts, such as a pendant and chain. In each group, fields include:
|
Group Name |
Optional. Allows you to label the detail columns in the Item window. |
|
Detail Name |
The label of the detail field in the Item window. |
|
Detail Type |
This defines whether the descriptor includes predefined choices derived from a list or if it will provide a blank field in which to type in the desired data when entering the item.
To use a predefined list, select it. For information on creating these lists, see the section entitled Lists. To use a blank field to create a custom detail, in the Detail Name field, enter the name of the field. Select either NUM or TEXT from the Detail Type drop-down menu. NUM will only allow you to enter numbers while TEXT will accept any characters. This field will now be an option in the Tags tab, Data drop-down menu. |
|
Advanced Options/More
|
Returns the Details: Advanced Options dialog.
This dialog defines data characteristics. Its contents may vary based on the type of data defined above.
If you are editing/replacing existing default details, you must change the Storage on that detail to one of the numbered itDetail choices. If you are creating new details, you need not change the Storage setting.
Check the Storage drop-down menu for data types that exist in the database. Values might include: •itStyle •itMetalFinish •itMetalColor •itMetalType •itMetalWeight •itSize •itLength •itMfg •itOldBarcode •itOldKey •itCostReplacement •itSerialNumber •itMillimeter •itDetail_1 •itDetail_2
|
You can use the Copy From… option for any particular tab to import that tab information from another category. You can also use the Defaults option to load default category information.
|
|
The suggested item description generated for the receipt is from category, type, gender, stones, and system-generated detail fields. Custom detail fields will not affect the description. You can manually update the description when adding inventory. |
4. Complete the Details tab fields as appropriate, and select the Tags tab.

Fields and options in the Tags tab include:
|
Media |
The type of tag to print. The Edge comes with default layouts for each available type. |
|
Outlines |
Shows outlines on the screen while the tag is being composed. Outlines are never printed and should be enabled while manipulating the tag layout. |
|
|
Select to print sample tags. Also useful for testing the functionality and alignment of a tag printer. |
|
Details of Selected Tag Field |
Shows the details of the selected tag field. The fields are described below. |
|
Previous |
Goes to the previous field on the tag. |
|
Next |
Goes to the next field on the tag. |
|
Remove |
Removes the field from the tag. |
|
Add |
Adds a new field on the tag. |
You can use the Copy From… option on any tab to import information from that tab of another category. You can also use the Defaults option to load default category information.
Editing Tag Fields
In the Tags tab, there is a preview of the tag and each field on it.

Each field has its own set of details. Select a tag field and you’ll see those details. In the example below, we’ve selected the field containing the Retail price of the item.

Use the Details of Selected Tag Field fields to change the data in each field. You can remove or add fields by using Remove or Add and work in the details fields to populate them.
Fields in the Details of Selected Tag Field Include:
|
Left |
The margin for the left side of the tag field. |
|
Top |
The margin for the top of the tag field. |
|
Width |
The width of the tag field. |
|
Height |
The height of the tag field. |
|
Font |
The font to be used. |
|
Align |
The alignment (i.e., centered, left, or justified). |
|
Prefix |
Any text that should appear at the beginning of the field. |
|
Only if Data Present |
Indicates that the prefix should only appear if data is present. Otherwise, that part of the tag will be blank. |
|
Data |
Select the data to display in this field on the tag. Please note that in addition to our default choices, any details added on the Detail tab will appear as valid data choices. These can be found at the end of the list. Values for jewelry plan costs and cost plus retail can be selected. That serves as a starting point from which to explain care plan pricing to customers. |
|
Sample |
For the purposes of a preview on this screen, how data of that type might appear. |
|
Format |
For any particular data type, the format in which it should appear. For details on using letter codes or cost codes see the tip sheet entitled Tag Formats and Letter Codes at www.EdgeUser.com. |
|
Parameter |
Any additional information required in formatting the field, for example, the letters to be used in a cost code. |
|
Postfix |
Any text that should appear after the data. |
|
Only if Data Present |
Indicates that the postfix should only appear if data is present. |
In addition to changing data, you can modify the positioning of fields on the tag with your mouse by clicking and dragging to its desired position or by using the arrow keys on your keyboard. Also, you can resize the fields on the tag. Move your mouse to the right side or bottom of the tag field. When your mouse cursor turns into a double arrow, click and drag to resize the field in the specified direction. This can be done with the keyboard by holding the shift key and using the arrow keys. See The Edge video tutorial library for demonstrations of this functionality:
•Inventory, Tag Layout, Basic: http://www.screencast.com/t/B1Errif1XOL
•Inventory, Tag Layout, Advanced: http://www.screencast.com/t/SFuqt3qfB.
|
|
If you are changing tag systems, you change tag layouts en masse. Contact The Edge Support Team for assistance. |
5. Complete the Tags tab fields as appropriate, and select the Taxes tab.

6. This tab is used in the event a category has taxes that are different from those of other items, such as one that is classified as a luxury item. These taxes can be selected from those shown here, which are defined in the Administrative menu. Setup of taxes is discussed in the section entitled Sales Tax.
7. Select applicable taxes from the Taxes tab if appropriate.
8. When you have completed tax information, you can select the Description Template tab. Note that basic data fields in the other tabs are required before you can continue with the Description Template tab.

Fields and options in the Description Template tab include:
|
Merge Fields |
A list of data fields that can be used as variables in the description text. These will change according to the category. Click the top level to expand the field merge lists. |
|
Insert |
Use this to insert the selected merge field into the description text. |
|
Clear All |
Clears the entire description text. This cannot be undone. |
|
Add Stone |
Adds a stone to the merge fields with the same available variables as the primary stone so you can add descriptions for as many stones as you like. |
|
Remove Stone |
Removes the selected stone. |
|
Copy From |
Copies a category template from another template. |
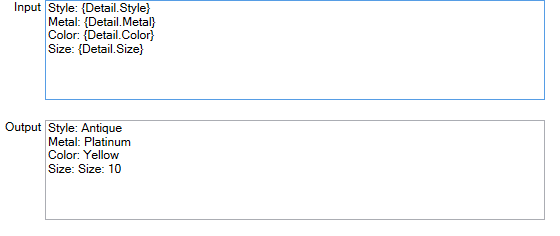
9. Use the Description Template tab to create a template to be used for items in this category when you enter them and select Suggest [description].
a. Some data will always be pulled from the category record, such as the description. In this case, it is Lady’s Engagement Ring.
b. Use the merge fields on the left, which expand, to enter variable data that The Edge will populate based on specific item data. Click on a merge field, and it will appear in the Input and Output preview fields. In the Input field, enter text, punctuation, and carriage returns as desired around the merge fields.
c. Continue adding fields and text until the description appears as desired in the Output field.
d. You can add stones using the Add Stone option or remove them using the Remove Stone option. For each stone you add, the stone variables will be available for that as well.
10. When all information has been entered in all the tabs, select the desired save option from the Record Navigation Bar.

